The Beginning of The Vintage Tractor in Watercolor
My subject matter for the current watercolor painting is different than recent paintings. The vintage tractor has sun-faded paint, rust, dents, and wonderful textures! Add all that color and it's practically begging me to put it on paper. It's a big change, not quite the same as a landscape or flowers. While the flower has its own tiny details to conquer, there is more wiggle room for the artist. If the petal moves a little to the left, it's just fine. If the stem is a little longer, no problem. I can always add a few more leaves. Well, I'm not giving myself an easy challenge here but I still can't resist. That -and my husband is really, really excited about watching this one come together.
What about subjects with more mechanics, pieces and parts? You see, if it's a subject matter that others know well and proportions are off, there's a problem. This is something I've faced before with subject matter like vintage automobiles. Now, the current watercolor painting in progress, a vintage tractor is the same. The sketch used is the foundation of the painting. Careful planning is necessary for the sketch to be completed. Are you curious about how that drawing begins?
How does an artist plan out the detailed sketch?
Are there tricks that help make it more successful?
That's what I'd like to share today!
First, I'll show the original photograph, where this all began. On a Saturday morning, my husband and I were checking out all the great finds available at Timeless Tom's. We both enjoy the hunt for something we must have...it doesn't matter that we weren't really looking for it. I've got a love of searching through all the variety of items he brings from farm and estate auctions. The tractor didn't come home with us. With my camera, I was able to snap a few photos of this one-of-a-kind homemade tractor.
Once the photo is imported into photo editing software, I can make any needed changes for using it as an art reference photo. That might include cropping, adjusting the fill light and highlights, and increasing the color saturation. I save that version. Then, I create a version with some more noticeable filters applied. This version has more artistic license. It's my rough draft guide to where my creative juices want to take it in the final painting. Let me say, if you really like that version, I could order the photograph as a print on fine art papers or canvas. Let me know. We'll talk.
I have my reference photos printed online or at a local photo kiosk. For this project, I have a printed copy of the second version with the editing done. These tips can be followed with photos displayed on a tablet as well.
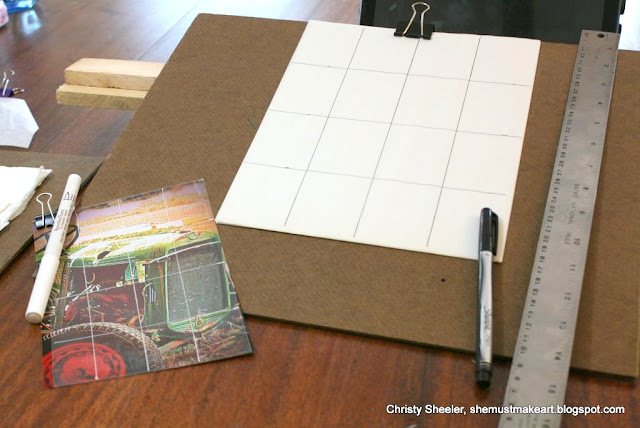
I gather the art materials I'll need to create the grids for sketching first. The acetate is harder to find here so I order it online with any major art supply company. The white pen can be found at an art & craft supply store, where pens and markers for scrapbooking are displayed. Scotch matte-finish tape works great and is more easily removeable from photo paper. The tracing paper has been in my art supply stash for many years. You can probably tell by the vintage look of the cover.
The materials I used:
- clear acetate (Grafix or Dura-lar)
- white pen (Recollections opaque marker, medium tip)
- tracing paper (medium weight is my choice)
- fine-point black permanent marker
- ruler
- clear tape
- pencil (mechanical or regular 2B wood pencil)
- erasers
To begin, I plan out two grids. One grid (on acetate) will be placed over the reference photo. I trim the acetate on my paper cutter to the same size as the photo (5" x 7"). The other grid (on tracing paper) will be placed below the tracing paper for sketching. I'm not sure that's clear...While sketching I'll have two layers of tracing paper. The top layer will be blank for the sketching and the second layer will have the black line grid. The sheet of tracing paper needs to be the same size as the watercolor painting. My paintings up to this point have been 8" x 10" in size. The two grids need to have the same pattern and approximate shape of squares.
On the acetate, I use the white pen and a ruler to draw the lines of the grid.
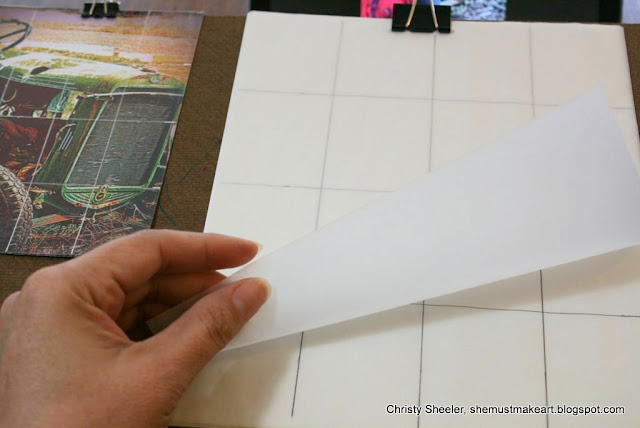
On the tracing paper, I plan out a corresponding grid. Using the black permanent marker and a ruler, I draw the lines on the tracing paper.
Both of these grids are reusable tools. I keep them for future sketching projects. If you try this, remember that the tracing paper with the grid is NOT for sketching on directly. Make it once, keep track of it, and use it again many more times.
Using small pieces of clear tape (a type easily removed without tearing the photo) the acetate grid is placed on top of the reference photo.
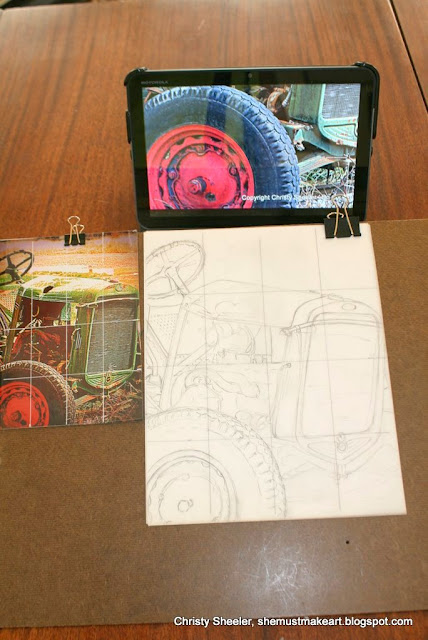
Great tip: this clear acetate can be placed on the tablet screen. I've found the screen still responds to finger touch through the acetate. You don't need a printed photo and many artists are using tablets now.
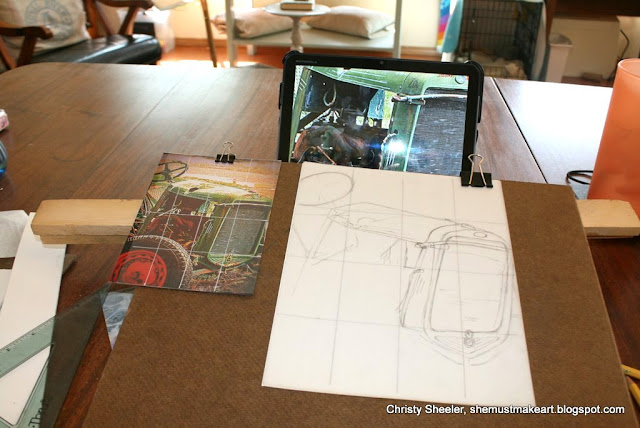
The tracing paper grid is placed under another sheet of tracing paper. The blank tracing paper on top is transparent enough so I can easily see the marker grid on the sheet below. The marker grid could be drawn on a piece of white copy paper. I just want to see the grid without it being a part of the finished sketch.
The two grids help the process of sketching details in proportion. In this case, people who have a lot of knowledge of this subject will see if there are problems with how it's been drawn. Working square by square, I study the details and record with pencil what is seen in that area.
I have really come to enjoy creating the foundation sketch on tracing paper. My sketchbooks are collecting dust at this point. These sketches would last longer if done in the sketchbook. Tracing paper is thin and delicate. I should begin thinking about the best way to store, protect, and present these tracing paper sketches.
When the sketch is complete, I'm ready to transfer it to the watercolor paper. If you haven't tried making your own transfer paper, you should! It's quite easy and worth the effort. You need tracing paper, a soft 6b pencil, a cotton ball and some rubbing alcohol. If you're interested in a tutorial, let me know. There are several tutorials on the Internet that make it easy to understand.
There's an important reason for using the graphite transfer paper. I don't draw the sketch directly on the watercolor paper anymore. The pencil lines can easily be too heavy and create impressions in the paper. At times, even after erasing, the impression of the previous pencil line remains. Erasing the lines to correct the sketch will rough up the watercolor paper. That's what I want to avoid. All these habits help make the watercolor painting a better one. The graphite paper will leave behind some unwanted graphite dust on the watercolor paper. That's easily removed with a kneaded eraser. Blot the graphite dust that's left behind by pressing the eraser and lifting it back up.
I've shown you the basic process that is the foundation of the painting. It's gone from reference photo to tracing paper to watercolor paper. I do my color mixing swatches next. Once the color mixing plans are ready, I'm ready to begin the painting itself.
Next post, I'll be sharing the progression with watercolor paint being applied gradually in layers.
I've got quite a few photos showing the changes that take place. The painting develops from soft washes of color; warm golds and cool blue grays are the foundation for rich vibrant color results
P.S:
If you've been following me on Instagram or Facebook, you've seen a few of the photo updates along the way. I think it's interesting to compare the photos alongside each other, seeing little changes that lead to the finished artwork! The Contact Me Page has those links and more.
I've been slowed up in my studio progress lately. With some low back and hip pain, I've switched to using the plein air easel and that's making a difference. Headaches are becoming another problem, so I'm adapting my schedule more.
I've been approved to sell giclee prints in the Etsy shop. Now it's a matter of scheduling time to make that happen. Society6 shop needs more artwork added and that will be on my to-do list. Be sure to follow the links if you're curious about new items available in the future.
--------------------------------------------------------------------------------------------------------------------
That's all for this week!
If there are any steps or methods I describe and you're left with more questions, ask away!
I'd be glad to share more about any of these techniques and tools. I'm never sure how much to share without overwhelming or boring others. So feel free to chime in, ask me to explain it again!
-Christy


No comments:
Post a Comment